
The Ultimate iBeacon Guide for 2020
Tips from years of experience with iBeacons. This makes the iBeacon fleet more effective and its operation cheaper.
Many of our customers have beacon installations with more than 100 active units. The effectiveness of a beacon fleet and the total cost of ownership are set long before the first app user runs into their proximity.
The initial cost of 10 to 65 Dollar per unit is not the entire cost over their lifetime – you also need a budget for rolling out and maintenance.
We want to pass on our experiences of the past years – from tourism and big events to arts & culture and museums to proximity marketing for cities or real estate. The goal is to give you the best possible results for a given budget.
1. Best possible preparation
It’s a good idea to plan your locations and their content well before you roll out.
For indoor installations, a floor plan is handy. For planning large-scale outdoor installations, you can either work with spots within the xamoom CMS or use Google My Maps as an aid.

A good list is beneficial when it comes to planning all your locations.
The question is not to reach always most people but to reach the best ones. The highest transmission power can be detrimental because it might cause an overlap between individual transmitters. If in doubt, you should always throttle the performance by at least one of level, drawing smaller circles that do not overlap and cause less confusion for users.
2. Help with your buying decision
We do support every beacon from every manufacturer. They only need to adhere to Apple’s defacto standard called iBeacon and they must be freely configurable the IDs from the xamoom CMS.
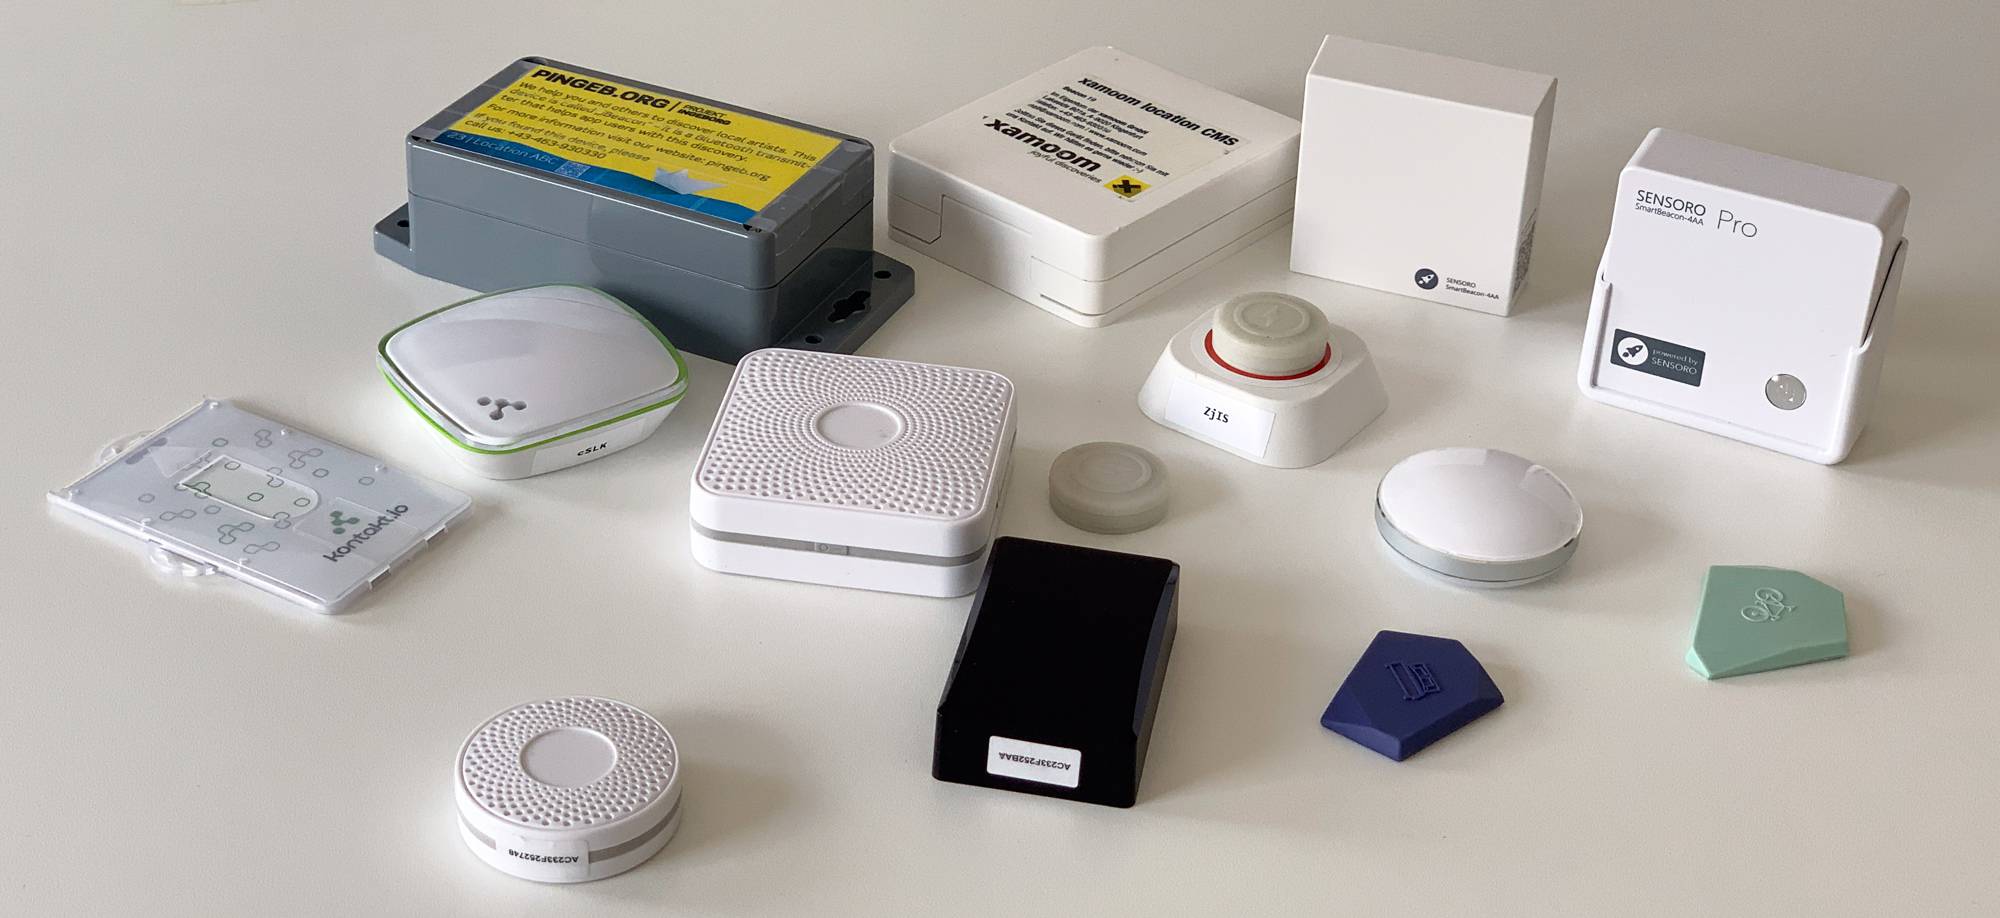
There are about a dozen beacon manufacturers which mostly are based on the chipsets from Nordic Semiconductor. There are not many differences in the basic functionality – all work the same way. Whether you decide to buy the $ 10 Dollar cheap SmartBeacon 4AA from Sensoro or spend 65 Dollar on the most expensive HD 18-3 from kontakt.io – their primary purpose is always the same: the broadcast IDs.
The price differences come from the following features:
- Purpose: Outdoor models are splash-proof and dust-proof. Some even have foam insulation and can be used between +80°C (+144°F) and -40°C (-72°F).
- Casing: In addition to protecting the Bluetooth board, the exterior of the Bluetooth transmitter is also vital for mounting. Does the desired model have the necessary holes in the right places? Can cable ties be used, or does the manufacturer supply high-quality adhesive pads? Are requirements for clinical rooms such as antibacterial surfaces met?
- Power source: Ideally, the batteries are interchangeable. Button cells are compact and last a long time while AA batteries are cheaper. We recommend lithium batteries that have very long lifetimes.
- Management: High-end manufacturers are more expensive because they go the extra mile to make the configuration as convenient as possible and help to change it later during the operations. However, this is not always necessary because of xamoom’s ability to change the content dynamically within the CMS or to deactivate the beacon with a mouse click.
- Security: Every script kiddy can read the IDs of an iBeacon, buy one and create a clone. In most cases, this doesn’t matter at all, but there are also applications where contact with the right iBeacon can be worth a lot (for example, in asset management or subscription services that may only be offered in specific locations). Here, more expensive beacons provide mechanisms such as ID shuffling, which randomly change the major and minor IDs. So copies of iBeacons are virtually impossible.
- Branding: While European brands such as Estimote and kontakt.io bring their brands to the forefront, Chinese manufacturers allow the complete branding of iBeacons. From a surcharge of about one dollar each, you can print your logo on the transmitter.
- Preconfiguration: For a fee, all manufacturers offer to deliver the iBeacons already with the correct configuration values.
- Individual form factors: There are iBeacons for almost all applications – from portable wrist bands to cards for the wallet to models with a permanent power supply via USB.
- Energy-saving mode: Some devices can be automatically turned on and off at certain times. This saves electricity, and during some hours nothing is going on anyway. Power saving is particularly clever with the light sensor – in the dark the beacon goes to sleep and wakes up as soon as it gets light again. Some have movement sensors turning the device on when in motion.
- Software updates: Beacons also have software that determines their functionality. More expensive manufacturers update the firmware of their iBeacon regularly and bring improvements or bug fixes to their hardware. The update is done via the configuration app on the phone.
Also crucial for the purchase decision is the availability. It is not recommended to postpone the purchase for too long. Interestingly, China imports are usually faster (five working days) available than supplies from manufacturers in Poland or the United Kingdom. Imports from China are also quite unbureaucratic since there is no customs duty on imports of the iBeacons to the European Union.
Two budget beacons that we can recommend:
- Sensoro SmartBeacon 4AA: The cheapest indoor model of the Chinese runs on four AA batteries for a very long time and is configurable via an app. Price: 10 Dollar excl. shipping.
- Sensoro SmartBeacon 4AA Pro: The outdoor model has IP67 certification and offers an extra mounting case, whose practical use … well … is modest. The configuration is done via an app.
Price: 16.50 Dollar excl. shipping.
In addition, you need four AA batteries each, which cost about 1.20 Euro per piece.
Two high-end beacons that we can recommend:
- Kontakt.io Heavy Duty Beacon (HD 18-3):
The most expensive beacon is a workhorse. Thanks to its IP65 rating, it is designed for bad weather conditions and thanks to foam insulation for extreme temperatures. Unfortunately, the battery is soldered so that it is not interchangeable. At least it’s durable – according to the manufacturer, it should work for up to 168 months with average configuration. Kontakt.io excels with simple configuration, regular firmware updates and good management.
65 Dollar per item (excl. shipping) – in larger quantities, it is a bit cheaper, but there are sometimes long delivery times of several weeks. - Kontakt.io Beacon Pro (BP16-3):
The classic beacon has a simple mounting plate on the bottom, which is clicked up as soon as it is screwed on. Although designed for indoor use, it is splash-proof, according to IP-54. Three button cells (CR 2477) serve as power supply which, according to the manufacturer, should be good for three years with a typical configuration.
Price: 36 Dollar per piece (excl. shipping) with longer waiting times.
3. The proper configuration
Every iBeacon works the same way – it broadcasts three IDs:
- Universally Unique Identifier (UUID): At xamoom this is always de2b94ae-ed98-11e4-3432-78616d6f6f6d
- Major IDs identify our customers with IDs from 0 to 65535 (e.g., 52414 is for Project Ingeborg)
- Minor ID: This random number between 0 and 65535 identifies the location or the object (e.g., 26051 is Klagenfurt’s main railway station)
Multiple beacons can have the same ID – for example, when the same content is to be served on a larger area or indoor as well as outdoor. For the app, this looks like a single big beacon.
Alternatively, multiple iBeacons with different IDs may have the same content. Both only seem to be the same because but they are different because of a concept called “cooldown”. During a rest period, no more notifications for one beacon ID are shown on mobile devices. If the IDs are different, the same notification will show up again multiple times.
In addition, most beacons also send telemetry data, which provide information about the battery charge. Some models also inform about air pressure or temperature. Apps can receive this data and respond accordingly. The telemetry data is ignored by most apps and only displayed by the configuration apps of the beacon manufacturers. However, it would also be conceivable that an app serves as a proxy to the backend where a database stores this data for a (later) examination.
iBeacons are configured via apps from their manufacturers. Some, such as kontakt.io, make this process very easy through a web interface. For most other manufacturers, the configuration data can only be edited via a smartphone app. But even that is not as complicated as it was years ago.
In addition to the IDs, there are three more values to consider:
- Broadcasting power and range: This is usually indicated on a scale of 1 to 10. The higher the transmission power, the greater the range, and power consumption.
- Advertising interval: This determines how often the signal is sent. The minimum here is every 100 ms, but it can also go up to every 12 seconds. The more often the IDs are submitted, the shorter the battery life. Shorter intervals also ensure that the beacon is recognized by the app in a timely manner. The ideal interval shall be agreed with the app developer.
- Received signal strength indicator (RSSI)/measured power: The transmission strength depends on the distance to the transmitter and its transmission power. However, reality always affects the signal due to reflections or other disturbances. If, for example, you need to calibrate values for a location, you must compensate them with the values for mRSSI and the measured energy. If that sounds too complicated or you do not know precisely what to do, ignore this value.
Because the first two factors have a significant impact on battery life, they should be planned precisely. Less is often more.
It’s critical to set a password for iBeacons. Otherwise, anyone with the correct configuration app (there are only a handful of manufacturers) could write new IDs on the iBeacon and “take it over”. Be sure to write down the password – preferably in the beacon deployment list.
The final setting can be done within the xamoom CMS. You can disable beacon notifications – de facto disabling the device – temporarily or permanently by removing the page from the spot (the spot will remain visible on maps) or disable the spot completely.
4. Equipment for the deployment tour

Not all iBeacons need to be installed at the same time. You can do this step-by-step. Insert the batteries into the device on-site or activate the beacons there. For this reason, the xamoom CMS also works wonderfully on the smartphone. So you avoid being annoyed by constant notifications.
In addition to the most efficient route, another consideration is essential: which tools and which mounting materials are needed on the go? Sometimes a ladder is necessary too. Thinks in advance saves a lot of time and kilometers later.
Which definitely has to go on the tour:
- screwdriver or wrench
- pliers and tongs
- depending on the model: adhesive tape or pads, cable ties or pipe clamps
- a stepladder
- smartphone for taking photos or doing last configuration changes and a test the live installation on site
- the printed beacon list
5. Documentation
Even though beacon scanner apps can lead you to the beacon by telling you the approximate distance, that does not mean that you will find it soon. Specifically, if the maintenance is done by another team member other than the one who did the roll-out, documentation is crucial.
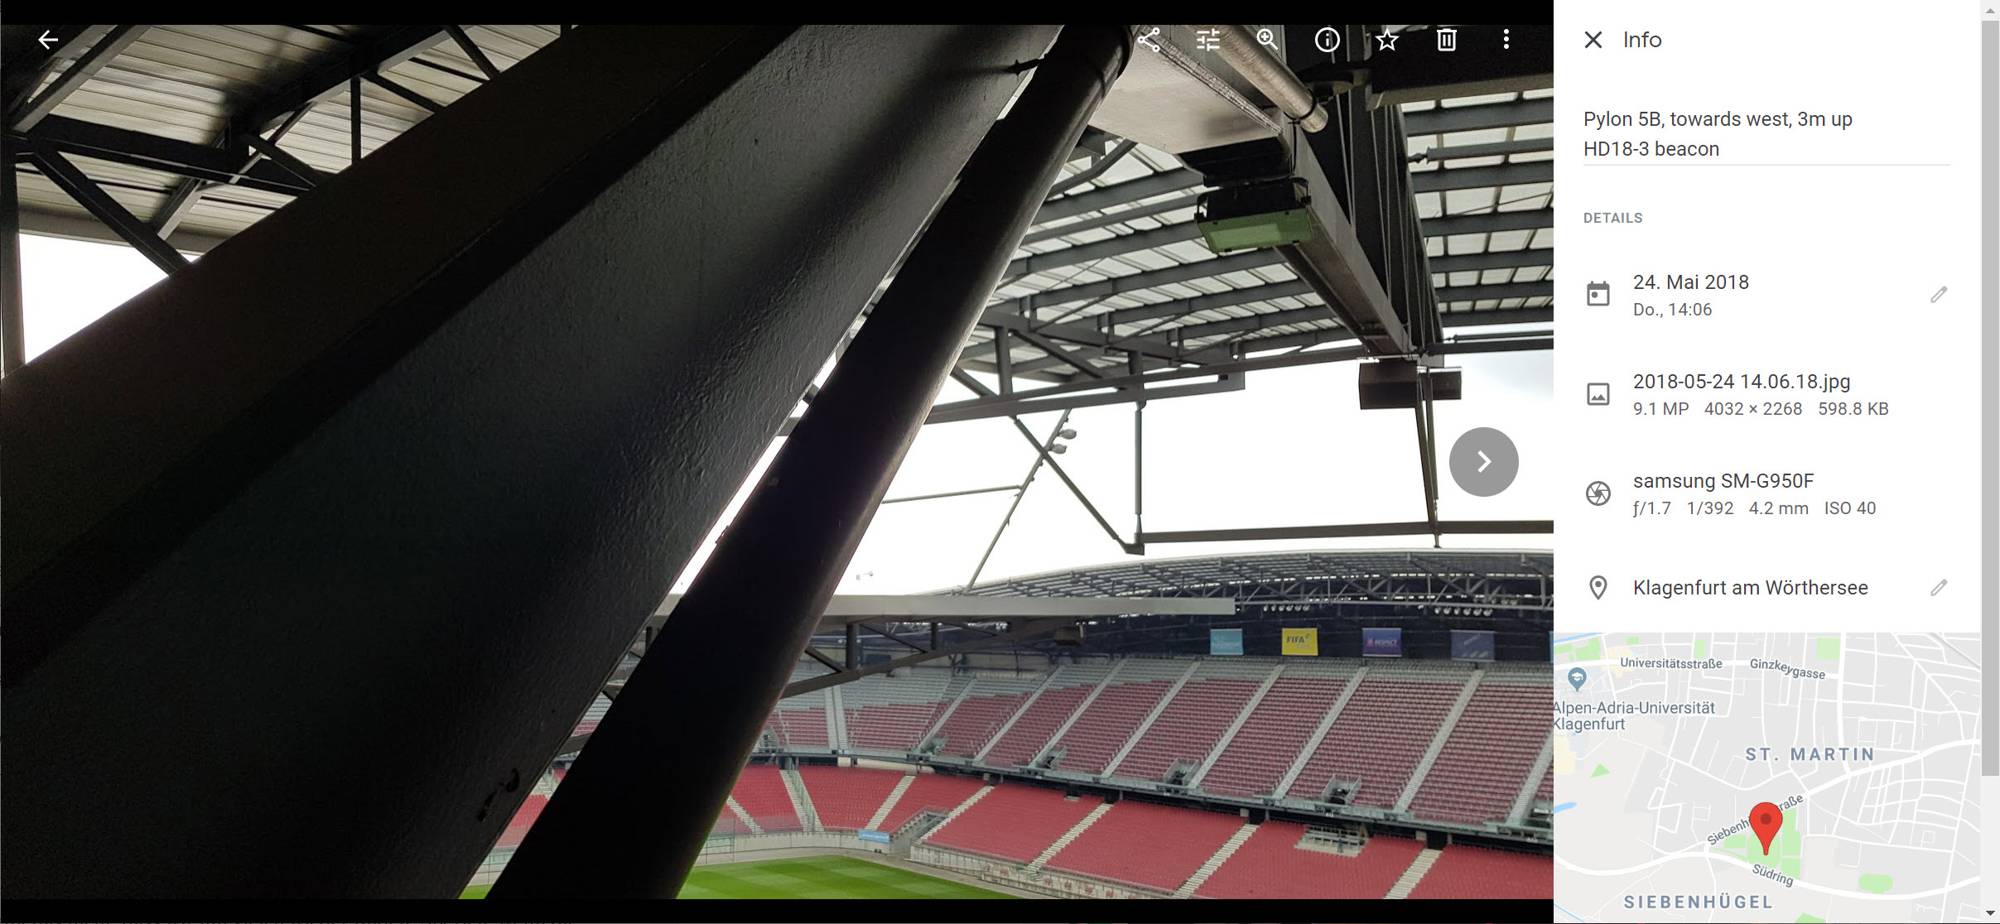
This includes entries in the iBeacon deployment table mentioned above as well as photos. However, you should make sure that the pictures can be located again – the photo of a white corner in a house is rarely helpful. Two images per location – one wide-angle, one detail – are better.
Google Photos is helpful because the service also shows the geo-coordinates and photos on a map. Such albums can be shared with team members. Individual photos can be referenced via URLs and stored as well in the beacon table.
6. The best suitable location

Especially where larger crowds are expected, beacons should be positioned as high as possible. The reason for this lies in the frequency with which Bluetooth transmits its data: water absorbs radio waves in the range of 2.4 GHz very well – and humans are made of a lot of water. The goal is, therefore to have as few people as possible between the transmitter and the smartphones. So beacons need to broadcast from high above.
Also, you should check with the manufacturer, how the beacon is constructed, and how its antenna is aligned. Each manufacturer can give useful tips for setting up. Choosing an expensive beacon with an extra long-range does not help, if you place it upside down.
Protection against theft and vandalism is also critical. Even if a beacon doesn’t serve anyone else, many have been opened or taken away by passers-by due to boredom or plain curiosity.
Two lower-range beacons are often better than one with a longer range. If you place them on opposite ends of a large square, you will not only reach niches but also ensure a reliable installation.
Finally, one should not forget that in many cases, permits for installation by third parties are to be obtained. Anyone who does this in advance saves time and nerves during the actual installation.
7. Increasing visibility

An iBeacon does not have to be visible to its users. This is both good and bad. When something is invisible, no one knows that there is anything useful in this place.
For increasing the usage, it is therefore vital to communicate the mobile information system on all available channels. Especially helpful are smart stickers or smart posters (smart because equipped with QR codes and/or NFC tags). It is ideal if the visible parts of the mobile information system also harmoniously embed themselves into its surroundings as in the example of our customer Zell am See-Kaprun.
Visible elements should inform and train the user:
- What is there? What information or service is provided?
- What’s in for the user?
- How to get to the service?
- What do I need for this, and what do I have to do for it?
Such information in public space not only promotes the use of the mobile service. They also contribute to the visibility of the project and thus of the company.
8. Adding a note
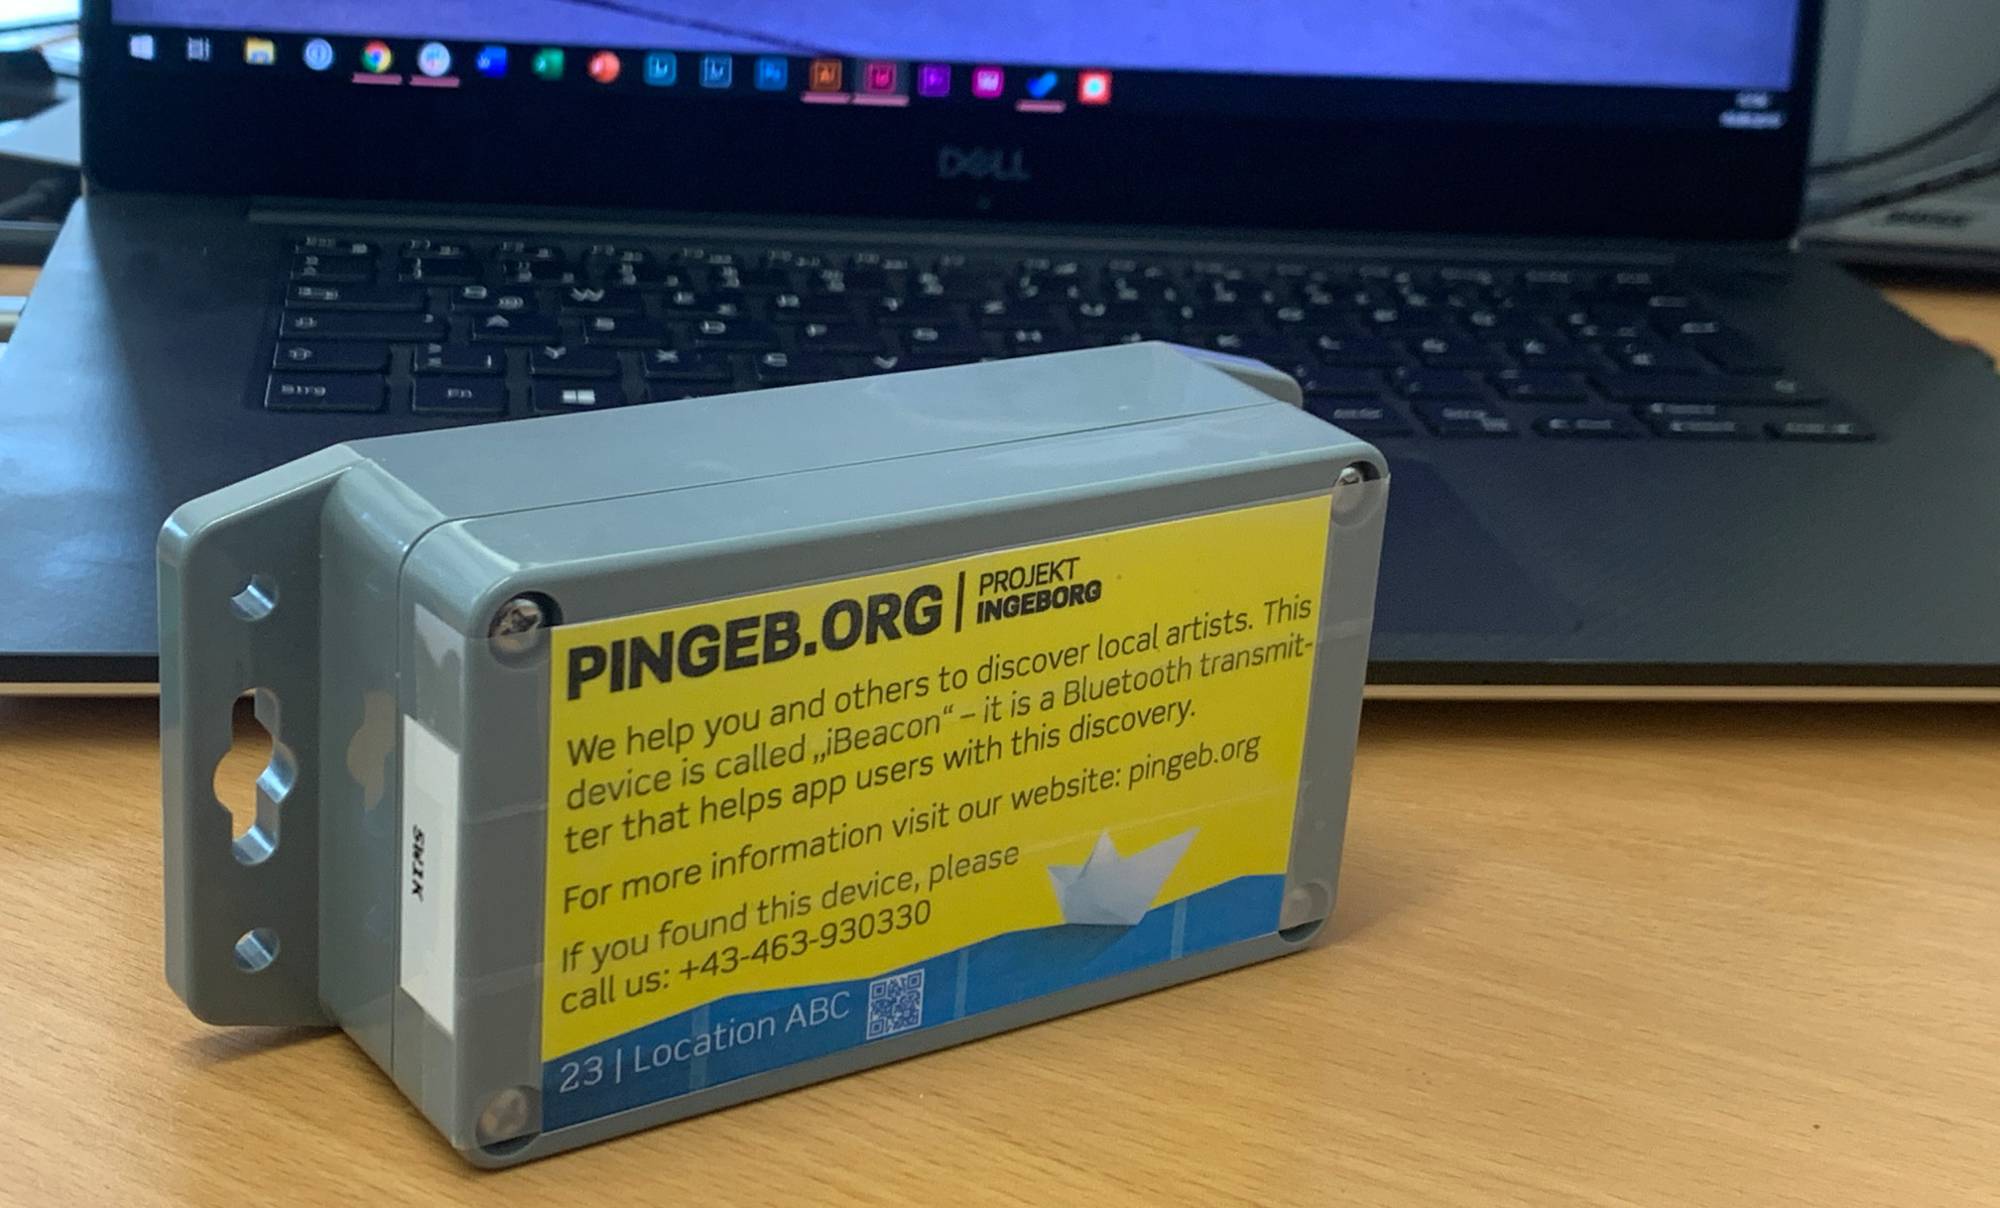
Adding a note to the Bluetooth has multiple benefits.
- Simplification of the setup, as it is clear which beacon goes where.
- If the device is found, the finder should have clarity what it is.
- The finder should also be able to contact the owner to report this.
All this can be done quite quickly with a label or paper and tape.
9. Test your beacon

Once the beacon is configured, installed and the setup documented, only one thing is missing: a test. Is everything working? Does the device broadcast as desired? Does the range fit the needs? A look at the configuration app of the manufacturer, reveals the battery level.
If necessary, you still have to do some fine-tuning, because the reality usually deviates from the plan – especially with such unpredictable things as radio waves. In the real world, unlike the plan, there are often walls with or without reflections.
So there is no way around getting to where the later users are suspected. Once you’ve tested the system yourself and felt it’s okay, move on to the next location.
